在 Windows 的環境下安裝一套能夠執行 PERL 腳本檔(PERL SCRIPT)的 Web Server System,對於外行人來說並不是一件容易的事情,好險有了雷電HTTPD,您只要依照如下的教學方式安裝Active-Perl for Windows軟體,就可以順利的在您的 Web Server 下執行副檔名為 .pl 或是 .cgi程式了! Apache 1 Apache 2 IIS 5 IIS 6
Active-Perl for Windows 這個套件能讓您在 Windows 環境下執行 .pl 及 .cgi 的 PERL 腳本檔,他不光可以搭配 IIS、Apache當然也能搭配雷電HTTPD。
Active-Perl for Windows 網址: http://www.activestate.com/Products/ActivePerl/
進入該網頁後,點選 Get ActivePerl 後選擇 Download FREE,當問及 Contact Details 時選擇 Continue 直接略過,進入正式的下載網頁後會看到 ActivePerl 5.8.8.820 (或目前最新的版號),選擇 Windows (x86) 下載即可。
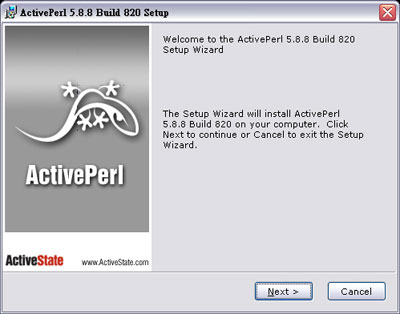
下載後執行其安裝檔案如 ActivePerl-5.8.8.820-MSWin32-x86-274739 看到如下畫面即開始安裝。

ActivePerl for Windows 之設定畫面

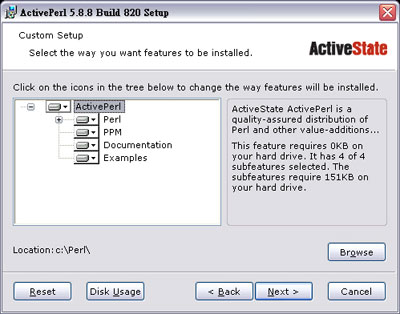
請安裝到預設路徑 c:\perl

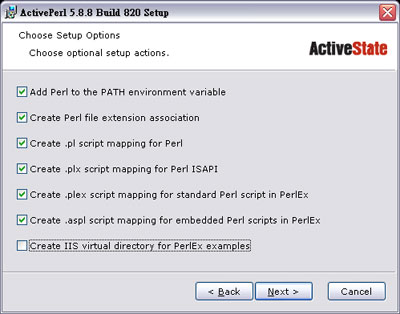
出現這個畫面時,如同我們所勾的來設定,這裡不需要建立 IIS 的相關設定。
安裝完畢後,您得開始設定額外的 Perl module (模組),例如許多 Perl 程式都要用到 MySQL 我們就先幫您把 MySQL 模組也設定好。
首先執行 Windows 之命令列提示 (cmd.exe command prompt) c:\perl\bin\ppm-shell.bat 然後 ppm> 的命令提示會出現如下:
PPM - Programmer's Package Manager version 3.1.
Copyright (c) 2001 ActiveState SRL. All Rights Reserved.
Entering interactive shell. Using Term::ReadLine::Stub as readline library.
Type 'help' to get started.
ppm>
|
輸入以下之命令後按 <enter>:
Install DBI<enter>
PPM - Programmer's Package Manager version 3.1.
Copyright (c) 2001 ActiveState SRL. All Rights Reserved.
Entering interactive shell. Using Term::ReadLine::Stub as readline library.
Type 'help' to get started.
ppm> install DBI
====================
Install 'DBI' version 1.42 in ActivePerl 5.8.3.809.
====================
Downloaded 508164 bytes.
Successfully installed DBI version 1.42 in ActivePerl 5.8.3.809.
ppm>
|
Install DBD-mysql<enter>
ppm> install DBD-mysql
====================
Install 'DBD-mysql' version 2.9002 in ActivePerl 5.8.3.809.
====================
Downloaded 178803 bytes.
Successfully installed DBD-mysql version 2.9002 in ActivePerl 5.8.3.809.
ppm>
|
正常安裝完畢後輸入 exit<enter>
到此 ActivePerl for Windows 的部分已經安裝完畢,接下來要設定 Web Server。
打開雷電HTTPD歡迎中心,點選網站選項設定後點選虛擬主機編輯器


注意這邊該做的兩個設定是第一把啟用CGI處理器1打勾並瀏覽CGI處理器位置如 c:\perl\bin\perl.exe 然後在下方CGI文件1的地方確認 .pl 與 .cgi 都已被加入,完成後按下確定。
若要在 Woindows 下的雷電HTTPD web server 測試 Perl,只要撰寫一個簡單的文字檔並且命名為 test.pl,內容如下
| use strict;
use warnings;
$|=1;
print "Content-type:text/html\n\n";
foreach my $var (sort keys %ENV) {
print $var . "=" . $ENV{$var} . "<br>\n";
} |
完成之後將它儲存在您網站的根目錄,並且使用瀏覽器打開下列網址 http://你的網址/test.pl,若成功您就會看到類似下面的畫面,這就表示 PREL 的安裝成功了.

|


